Wednesday, December 15, 2010

My Holiday Spiced Wassail


"Here we go a wassailing, among the leaves so green!..."  Wassailing, like in this song, is an old English tradition similar to the Christmas caroling we do now.  Wassail, the drink, is also an old "Yuletide" tradition that dates as far back as Medival times.  Although some modern recipes call to make it with a base of wine or fruit juice and apple or orange slices, historically it basically is a mulled cider with sugar and spices.
    
The recipe that I came up with is a mixture of both.  It is non-alcoholic (family friendly) that starts off as a base of delicious apple cider with some tart cranberry and sweet orange juice.  Then, I add all of the Christmas-time aromas and spices like brown sugar, cinnamon stick, cloves, allspice, and a bit of nutmeg!  MmmmMmm!  I finish it off simmering away with a sliced clementine orange and a few fresh cranberries!  This adds to the flavor and makes it look beautiful!  The cranberry juice gives the drink a pretty red hue that's perfect at Christmas--I love cranberries this time of year!

This is the perfect party drink that will warm you up from the inside out!  I made it for our Cookies and Cocoa party, and it was a bigger hit than the hot cocoa!  When family and friends arrive, your house will smell like you just took an apple pie out of the oven!  Sometimes, I will just make a small pot of it for just my husband and I to enjoy while watching a Christmas movie.  It makes the night feel extra special.  I think it would be a perfect drink to come to make after an evening spent caroling the neighborhood.  Whenever you decide to make this festive drink, just be sure to keep all of those special memories close to your heart! These are the times that we cherish and will look back on with joy!

                             I just want to wish everyone a very
                        Merry Christmas and a Blessed New Year!


Holiday Spiced Wassail

In a large heavy bottom sauce pan, pour in 8 cups of apple cider (not juice here), 4 cups of Cranberry juice and 2 cups of no-pulp orange juice.  Turn the burner on medium low heat.  Add in about 3-4 heaping Tbsp. of brown sugar, 3 cinnamon sticks, 5 cloves, a couple dashes of ground allspice, and a pinch of nutmeg.  (I used fresh nutmeg this time since a good friend gave me one of her's.) Add at least 2 slices or orange and a few fresh cranberries, if you have them.  Simmer until very warm.  I like for it to be on the heat at least 30 minutes before serving, so all of the flavor marry together.  Strain the spices, before serving, if you do not put them in a cheesecloth bundle.  (I have made it both ways.) Serve in mugs and garnish with an orange slice or cinnamon stick and cranberries.

Grocery List:
Apple Cider
Cranberry Juice
Orange Juice
Brown Sugar
Cinnamon Stick or Ground Cinnamon
Whole Cloves
Ground Allspice
Nutmeg (optional)
Orange slices
Fresh Cranberries

Monday, December 13, 2010

Frosty Lemon Cupcakes

 
     We just hosted our 3rd annual Cookies & Cocoa with the Cates' party on Saturday.  It's something that we look forward to every year--having my husband's med students friends (and mine!) over for a Christmas dessert party.  This gives me the chance to bake whatever yummy confection I want to, and that's just what I do!  This year so many friends came, and I made so much food, so it was a huge success!   The menu included my Christmas Linzer Cookies, Frosty Lemon Cupcakes, Coconut Macaroons (some with drizzled chocolate), Candy Cane Bark, Assorted Chocolate Dipped Pretzel Sticks, Frosted Sugar Cookies, Chocolate Truffle and Hazelnut Truffles, Chocolate dipped Marshmallows, Homemade Hot Cocoa, and Hot Spiced Wassail!!!  Yes,  I made everything!  It was a blast to be able to have fun in the kitchen and bake for days.  One of mine and Heath's personal favorites are the Frosty Lemon Cupcakes.  This is a very simple recipe that come from the "famous" lemon cake Mom makes every Thanksgiving.  The base is just a box cake mix that is all dressed up for the Holidays!  I'm not sure I made these cupcakes quite as ridiculously moist as her cake, but they were pretty darn tasty to me!  They actually became our breakfast the next morning, too!

     If you are a lemon lover, then you will die over these!  Moist lemon cake that is doused in real lemon juice with a beautifully frosty, sweet glaze that run off the top and down the sides of these baby cakes!  What's not to love?!?  Also, I really appreciate the simple elegance of these cupcakes.  The taste is just pure, sweet lemon without any heavy icing, and the appearance is lucious without being over-done.  Mom and I like to use fresh cranberries to garnish and decorate the cupcakes/cake.  I think the red of the cranberry really pops against the pale yellow, and it's just perfect for Christmas!  This recipe is a much loved tradition in my family that's here to stay.  I'm excited to share it with you!


Frosty Lemon Cupcakes

Grocery List:
1 Box Lemon cake mix
Eggs
Canola oil
2 large lemons
Powdered sugar

Prepare 2 muffin pans with liners. 
Prepare the cake batter using the directions on the box.  Bake them using the directions on the box. 

(This is the part where Mom makes them really good!)-- Take them out of the oven and out of the muffin pan onto a cooling rack. Allow to cool about 5-10 minutes before taking a toothpick and poking several holes in the top of each cupcake.  Squeeze into a small bowl, the juice of about  1 lemon.  (about 2 Tbsp)  With a spoon, pour the lemon juice all over the tops of cupcakes.  This will sink into all of those tiny holes of the warm cupcake and will completely drink all of this yummy juice!  This makes the lemon cake taste just a little bit tart and give it a very real lemon flavor.  The more juice you put in, the more moist and delicious they will be! 

Squeeze all of the juice out of the other lemon into a bowl.  Add enough powdered sugar to make a thick glaze consistency.  Pour about half of this mixture over the cupcakes while  they are still warm.  This will soak in a bit and drip down the sides.  Beautiful!  Whenever the cupcakes cool, pour the second half of the glaze and spread around the top. It's okay if it drips a little.  This second glazing will seal in all the moisture, give them that frosty look, and will make them taste perfectly sweet!  Soooo good! Allow to cool (if you can!) and enjoy with a tall, cold glass of milk or hot coffee!

Tuesday, December 7, 2010

Christmas Candy Cane Bark

                                                            
                                           Merry Christmas!!!
     It's not Christmas at my family's house without (peppermint) candy cane bark!  Mom has been making this easy and divinely sweet candy since I can remember.  As a child, I would make it with her and we'd eat it along the way!  I loved to help her break the bark apart once it had cooled.  (It's quite fun to make!)


If you haven't had it before, it's basically crushed candy cane in creamy white chocolate.  Yes, I said easy.The bright flavor of the peppermint candy cane and the rich white chocolate is a simply perfect combination.  It actually looks beautiful with the pinkish red bits of candy cane throughout the ivory chocolate bark. This is the perfect treat to put in a pretty Christmas tin and give to a friend, teacher or neighbor not only for the taste, but because it stores and travels very well.  It will actually stay fresh for 2-3 weeks!  What a perfect treat to have around and nibble on with coffee or drop into your mug of hot chocolate for a special Christmas twist!  I had to post this recipe to share with you our tradition, and let you know that not all candy is difficult to make.  Happy candy making! (Oooo! If you like this recipe, you'll love my Toasted Pecan Turtles!)


Christmas Candy Cane Bark
1 pkg. white candy bark
1 cup white chocolate chips
6-8 candy canes (as much peppermint as you like)
Using a sharp knife, break up the white candy bark so you won't have trouble melting it.  Put in a glass bowl, and microwave in 30 second intervals, stirring in each time, until almost melted all the way.  Add the white chocolate chips and stir well.  Then put back in the microwave for 30 seconds, take out and stir until very smooth and creamy.Crush your candy canes by placing in a heavy duty freezer bag and I usually using a rolling pan to crush the candy cane into both large and fine bits.  This takes a little effort, but well worth it!  Once crushed, stir in most of the crushed candy into the melted chocolate, leaving about 3 Tbsp.  Once it's all well incorporated, pour it onto a sheet pan covered in aluminum foil and spread out.  Take the remaining crushed candy cane and sprinkle over the top.  Pop into the fridge for about 15 minutes, or until set.  It will easily peel off the aluminum foil, and then have fun randomly breaking it up!  You want it to look like "bark".  Store in a storage bag or tin.  Enjoy!


Thursday, December 2, 2010

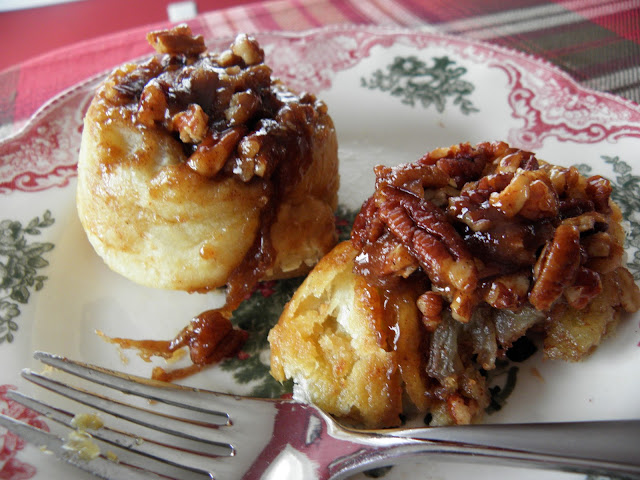
Incredibly Easy & Perfectly Delicious Sticky Buns


Attention, anyone who has a near-sinful sweet tooth (Me!!) or would love to welcome loved ones with an impressive breakfast treat that's way easier than anyone would believe!?!! This sticky bun recipe is perfect for you!  Honestly guys, if I could label some of my recipes according to "my favorites", this would most definitely be one of them! 

I made these puffy, buttery, sticky-sweet treats for the first time on New Years Day morning 2010 whenever we had some dear friends over for a festive breakfast.  Whenever I saw this recipe in The Barefoot Contessa's Back to Basics cookbook (that I got last Christmas), I knew that these would be the right way to ring in the New Year!  Let me just say that they were a hit!  They are just as easy to make as the recipe seems; and  whenever you take these beautiful little jewels out of the oven, your kitchen will smell like an Amish bakery!  I think the combination of the easy, yet so yummy, puff pastry dough and all the sweet molasses-flavored brown sugar with a hint of cinnamon makes this a treat that's perfect for breakfast, dessert, or with your afternoon coffee or tea.

 First off, if you have never used puff pastry before, you will want to after this!  You can find it around the pie crusts in the freezer section of the grocery.  It's very easy to work with;  just remember to allow time to let it thaw (about 40 minutes). In this recipe all you do is literally unfold it.  That's it!  There is no need to get out the rolling pin or do a lot of fussing.  This pastry is remarkable how it will puff and rise and get tender and flaky. The puff pastry is really what allows this sticky bun recipe to be so simple!  I didn't use raisins in mine because my husband isn't a big fan of them, but I think they would be delicious in there.  Another good choice might be dried cranberries or candied ginger.  Be sure and follow the directions whenever it says to bake them in the muffin pan sitting on a parchment paper-lined cookie sheet.  That way none of the bubbling goodness with make a mess in your oven.  After taking them out of the oven, allow to cool for only about 5 minutes, and then turn them out on that same parchment paper.  You can store these under a cake dome for the day, or in a Ziploc bag for longer.  They are great hot or room temp.  I mean how bad can butter, brown sugar, cinnamon, and flaky pastry be?!  -- I thought so, too.
 
Today is my husband's birthday, and I decided to surprise him with these hot out of the oven whenever he woke up.  He was thrilled! So we enjoyed sitting at the kitchen table overlooking a frosty, Christmas-y looking morning with our vanilla coffee and sticky buns.  There's no better way to say "Good morning" to the Loves in your life!

Sticky Buns
Makes 12

12 Tbsp. (1 1/2 sticks) Butter, at room temperature
1/3 c.Brown Sugar, lightly packed
1/2 c. Pecana, coursely chopped
1 pkg. (2 sheets) Frozen Puff Pastry

For the Filling:

2 Tbsp. butter, melted and cooled
2/3 c. brown sugar, lightly packed
3 tsp. ground cinnamon
1 c. raisins, optional

Preheat oven to 400 degrees.  Place a 12 cup standard muffin tin on a parchment paper-lined sheet pan.

In the bowl of an electric mixer, combine the 12 Tbsp. butter and 1/3 c. brown sugar.  Place 1 rounded Tbsp. of the mixture in each of the 12 muffin cups.  Distribute the pecans evenly among the 1 muffin cups on top of the butter and sugar mixture.

Lightly dust a wooden board or counter top with flour.  Unfold one sheet of puff pastry with the folds going left to right. 

Brush the whole sheet with half the melted butter.  Leaving a one inch border around the edges of the puff pastry, sprinkle each sheet with 1/3 cup of brown sugar, 1 1/2 tsp. cinnamon and 1/2 cup of raisins (if you choose to use them.) Starting with the end nearest you, roll the pastry up with the seam side down. Slice the roll in 6 equal pieces, each about 1 1/2 in. wide. Place each piece, spiral side up in 6 of the muffin cups.  Repeat with the second puff pastry and to make 12 sticky buns.

Bake for 30 minutes, until the sticky buns are golden to dark brown and firm to touch.  Let cool for 5 minutes only, and invert the buns on parchment paper.  You can help ease the topping and pecans out onto the buns with a spoon. 
Eat and enjoy!