Tuesday, December 7, 2010

Christmas Candy Cane Bark

                                                            
                                           Merry Christmas!!!
     It's not Christmas at my family's house without (peppermint) candy cane bark!  Mom has been making this easy and divinely sweet candy since I can remember.  As a child, I would make it with her and we'd eat it along the way!  I loved to help her break the bark apart once it had cooled.  (It's quite fun to make!)


If you haven't had it before, it's basically crushed candy cane in creamy white chocolate.  Yes, I said easy.The bright flavor of the peppermint candy cane and the rich white chocolate is a simply perfect combination.  It actually looks beautiful with the pinkish red bits of candy cane throughout the ivory chocolate bark. This is the perfect treat to put in a pretty Christmas tin and give to a friend, teacher or neighbor not only for the taste, but because it stores and travels very well.  It will actually stay fresh for 2-3 weeks!  What a perfect treat to have around and nibble on with coffee or drop into your mug of hot chocolate for a special Christmas twist!  I had to post this recipe to share with you our tradition, and let you know that not all candy is difficult to make.  Happy candy making! (Oooo! If you like this recipe, you'll love my Toasted Pecan Turtles!)


Christmas Candy Cane Bark
1 pkg. white candy bark
1 cup white chocolate chips
6-8 candy canes (as much peppermint as you like)
Using a sharp knife, break up the white candy bark so you won't have trouble melting it.  Put in a glass bowl, and microwave in 30 second intervals, stirring in each time, until almost melted all the way.  Add the white chocolate chips and stir well.  Then put back in the microwave for 30 seconds, take out and stir until very smooth and creamy.Crush your candy canes by placing in a heavy duty freezer bag and I usually using a rolling pan to crush the candy cane into both large and fine bits.  This takes a little effort, but well worth it!  Once crushed, stir in most of the crushed candy into the melted chocolate, leaving about 3 Tbsp.  Once it's all well incorporated, pour it onto a sheet pan covered in aluminum foil and spread out.  Take the remaining crushed candy cane and sprinkle over the top.  Pop into the fridge for about 15 minutes, or until set.  It will easily peel off the aluminum foil, and then have fun randomly breaking it up!  You want it to look like "bark".  Store in a storage bag or tin.  Enjoy!


Thursday, December 2, 2010

Incredibly Easy & Perfectly Delicious Sticky Buns


Attention, anyone who has a near-sinful sweet tooth (Me!!) or would love to welcome loved ones with an impressive breakfast treat that's way easier than anyone would believe!?!! This sticky bun recipe is perfect for you!  Honestly guys, if I could label some of my recipes according to "my favorites", this would most definitely be one of them! 

I made these puffy, buttery, sticky-sweet treats for the first time on New Years Day morning 2010 whenever we had some dear friends over for a festive breakfast.  Whenever I saw this recipe in The Barefoot Contessa's Back to Basics cookbook (that I got last Christmas), I knew that these would be the right way to ring in the New Year!  Let me just say that they were a hit!  They are just as easy to make as the recipe seems; and  whenever you take these beautiful little jewels out of the oven, your kitchen will smell like an Amish bakery!  I think the combination of the easy, yet so yummy, puff pastry dough and all the sweet molasses-flavored brown sugar with a hint of cinnamon makes this a treat that's perfect for breakfast, dessert, or with your afternoon coffee or tea.

 First off, if you have never used puff pastry before, you will want to after this!  You can find it around the pie crusts in the freezer section of the grocery.  It's very easy to work with;  just remember to allow time to let it thaw (about 40 minutes). In this recipe all you do is literally unfold it.  That's it!  There is no need to get out the rolling pin or do a lot of fussing.  This pastry is remarkable how it will puff and rise and get tender and flaky. The puff pastry is really what allows this sticky bun recipe to be so simple!  I didn't use raisins in mine because my husband isn't a big fan of them, but I think they would be delicious in there.  Another good choice might be dried cranberries or candied ginger.  Be sure and follow the directions whenever it says to bake them in the muffin pan sitting on a parchment paper-lined cookie sheet.  That way none of the bubbling goodness with make a mess in your oven.  After taking them out of the oven, allow to cool for only about 5 minutes, and then turn them out on that same parchment paper.  You can store these under a cake dome for the day, or in a Ziploc bag for longer.  They are great hot or room temp.  I mean how bad can butter, brown sugar, cinnamon, and flaky pastry be?!  -- I thought so, too.
 
Today is my husband's birthday, and I decided to surprise him with these hot out of the oven whenever he woke up.  He was thrilled! So we enjoyed sitting at the kitchen table overlooking a frosty, Christmas-y looking morning with our vanilla coffee and sticky buns.  There's no better way to say "Good morning" to the Loves in your life!

Sticky Buns
Makes 12

12 Tbsp. (1 1/2 sticks) Butter, at room temperature
1/3 c.Brown Sugar, lightly packed
1/2 c. Pecana, coursely chopped
1 pkg. (2 sheets) Frozen Puff Pastry

For the Filling:

2 Tbsp. butter, melted and cooled
2/3 c. brown sugar, lightly packed
3 tsp. ground cinnamon
1 c. raisins, optional

Preheat oven to 400 degrees.  Place a 12 cup standard muffin tin on a parchment paper-lined sheet pan.

In the bowl of an electric mixer, combine the 12 Tbsp. butter and 1/3 c. brown sugar.  Place 1 rounded Tbsp. of the mixture in each of the 12 muffin cups.  Distribute the pecans evenly among the 1 muffin cups on top of the butter and sugar mixture.

Lightly dust a wooden board or counter top with flour.  Unfold one sheet of puff pastry with the folds going left to right. 

Brush the whole sheet with half the melted butter.  Leaving a one inch border around the edges of the puff pastry, sprinkle each sheet with 1/3 cup of brown sugar, 1 1/2 tsp. cinnamon and 1/2 cup of raisins (if you choose to use them.) Starting with the end nearest you, roll the pastry up with the seam side down. Slice the roll in 6 equal pieces, each about 1 1/2 in. wide. Place each piece, spiral side up in 6 of the muffin cups.  Repeat with the second puff pastry and to make 12 sticky buns.

Bake for 30 minutes, until the sticky buns are golden to dark brown and firm to touch.  Let cool for 5 minutes only, and invert the buns on parchment paper.  You can help ease the topping and pecans out onto the buns with a spoon. 
Eat and enjoy!

Tuesday, November 23, 2010

Toasted Pecan Turtles


     I'm on a dessert kick!  Told you I would be:)  This is one of the things I enjoy making for our family's Thanksgiving, although they are probably thought to be more of a Christmas treat.  When I think of homemade candies I usually think of Christmas time, but why wait?  Thanksgiving desserts are all about pumpkin and pecan and cranberry.  While I love those too, somebody has to bring some chocolate, right!?   Leave it to me.  These toasted pecan turtles are the combination of perfection.  They start off with pecans that have been toasted in the oven to bring out an even more nutty, fragrant flavor that is hugged by a dollop of creamy caramel and topped with velvetty semi-sweet chocolate!  They begin to slightly melt in your fingers as you bite into the chewiness of the caramel and chocolate, then find the crunchy pecan bottom. Yuuuummmy!

     These are an easy candy to make.  I don't go by an exact recipe, but I will walk you through it!  There is no way you can't love these pecan turtles.  Enjoy them this holiday season!


Toasted Pecan Turtles

Start off by toasting your pecans in a 350 degree oven for about 5-6 minutes.  All that you do is scatter them out flat on a baking sheet that not greased and put them in the oven.  They can burn quickly, though, so set a timer!  I used 3 pecan halves to one turtle and I made about two dozen turtles.  So I had 72 pecans or almost 1 1/2 cups.

Unwrap your caramels, place them in a glass bowl and add about 1/4 c. evaporated milk.  Microwave in 30 second intervals, stirring in between.  Once melted all the way, stir well until thoroughly combined.

So, lay out a sheet of wax paper on a large cookie sheet...or two small ones.  Important step: Butter these very well so the caramel won't stick.  You must do this, or else you won't be able to lift them off the pan!  Divide pecans on the sheet into groups of three, and put in a "Y" position.  This is the base for your turtle.  Next, pour some of the warm caramel over each pecan cluster - probably about a tablespoon each.  The amount of caramel isn't a big deal, as long as you divide it evenly among them.  Once you've topped them with the caramel, place the baking sheet in the fridge to allow the clusters to cool.

While they are cooling, take your semi-sweet chocolate & chocolate bark, chop them and put 3/4 of it in a glass bowl. (I usually do a ratio of a little more Baker's chocolate to chocolate bark, because it has a better flavor -- the bark helps it to set up better, though.)  Microwave in 25 second intervals, stirring in between everytime.  Chocolate will easily burn, and these intervals and stirring will prevent that.  Once mostly melted, add the last 1/4 of chocolate and put in the microwave once more.  Then stir it very well until the chocolate is perfectly smooth and shiny.

Take out the pecan caramel clusters and pour about 1-2 Tbsp. of chocolate over each one.  You may need to use the spoon to spread it around a bit, but you don't have to completely cover the pecans or caramel.  Once evenly divided, put back in the fridge to cool.  Store in an airtight container with wax paper in between.

Grocery List

pecans
1 bag of caramels
evaporated milk
Baker's semi- sweet chocolate baking squares
chocolate bark (chocolate candy coating)

Sunday, November 21, 2010

Chocolate Chip (Ooey) Gooey Butter Cake!

                                                Happy Thankgiving!  
  
     Thanksgiving and Christmas are my favorite holidays, because it starts with a time to reflect on the year and be so grateful to God for everything He has given us and then immediately begin to celebrate the birth of our Savior!!  It's such a wonderful Christ centered time of year, which I celebrate like I do any other joyous occasion-- with lots and lots of baking!  My kitchen becomes a cookie shop and sweet treats bakery until the New Year.  Let the flour dust fly and sugar buzz begin!

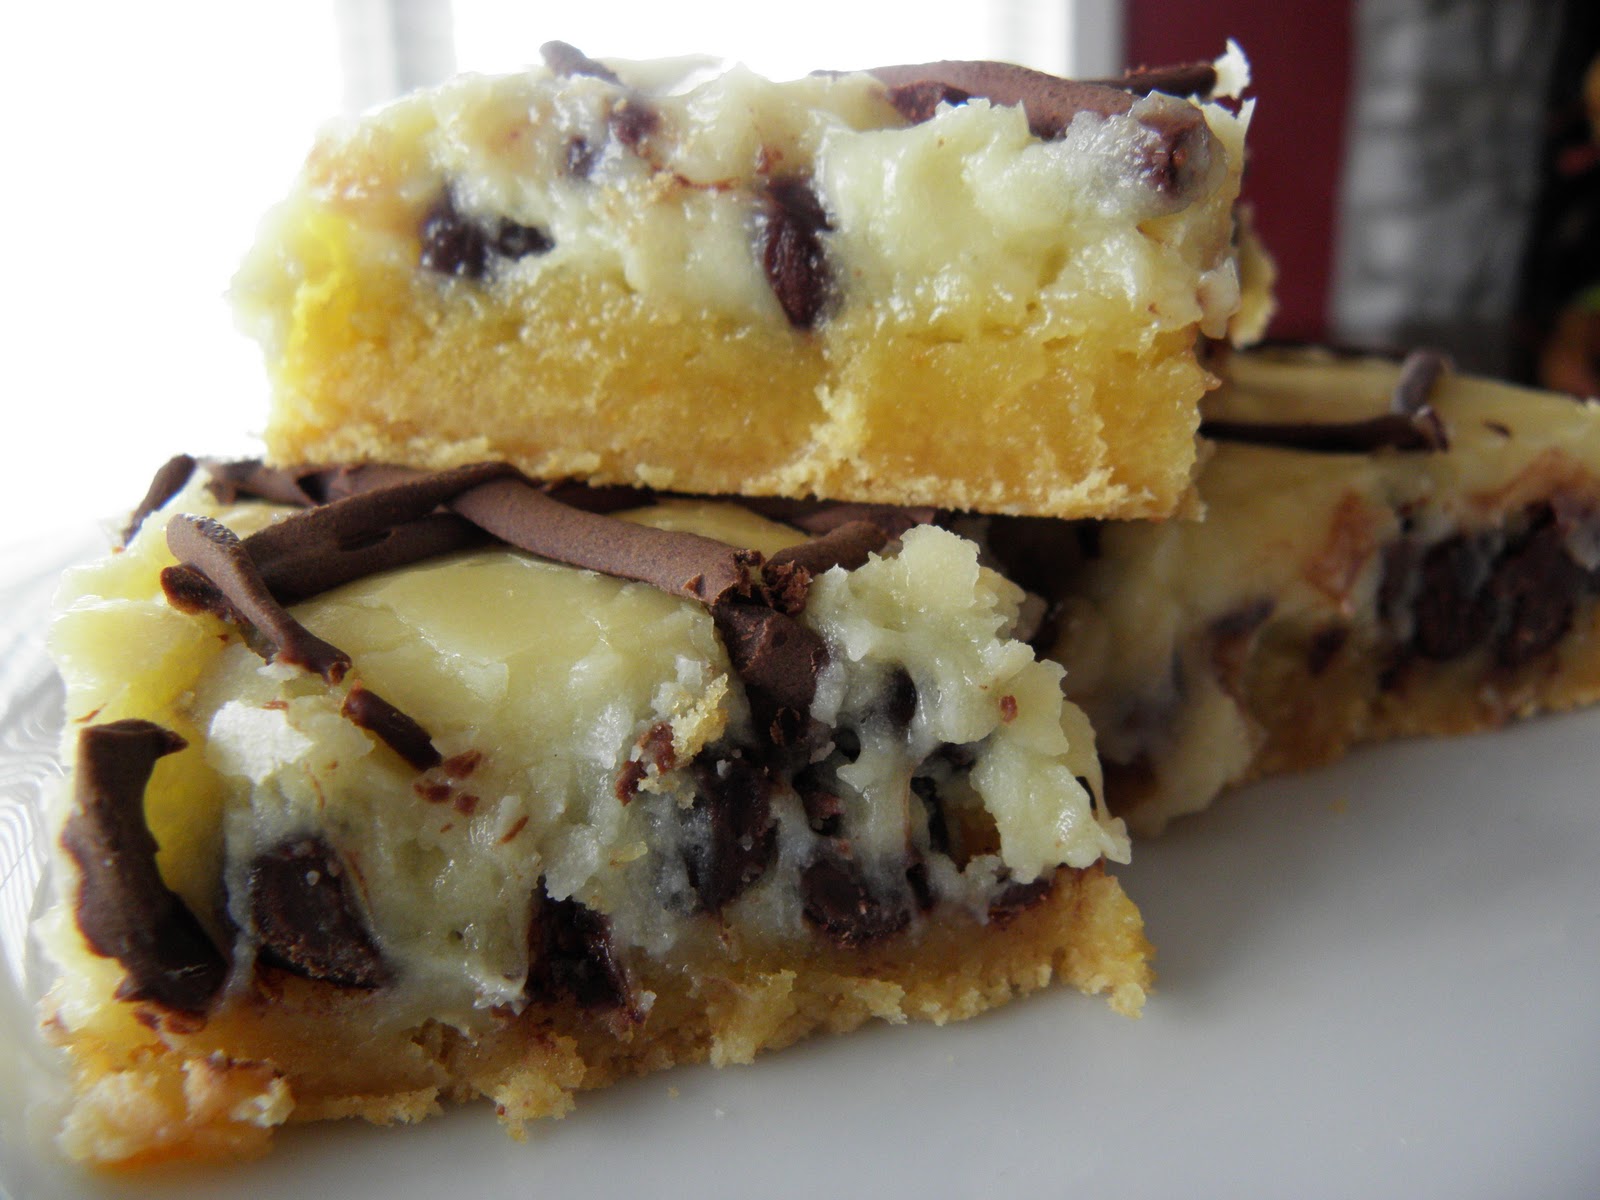
     We just had a couple of really great friends over for coffee and dessert fireside, and I decided to make these rich, gooey, buttery, sweet bars that are" best loved" in our household!  Just the name says it all: Chocolate Chip. Gooey. Butter (!) Cake.  Yowza!!  These yummy squares are so appropriate for Christmas because you will sing with the angels when you try them!  Yes, so I'm using a lot of explanation points (!!!) for this blog, but I'm so excited to share this recipe! Not only is this dessert a hit everytime, but it's incredibly easy to make!
   
     I would recommend using real butter for this recipe if you want a true buttery flavor.  You will use 2 sticks for this recipe.  Like my chocolate chip cookie recipe, this one has a lot of butter, and is worth every gram of fat. (I would also recommend a renewed gym membership post eating this.)  I used chocolate chip and chunks this time, but I've also made them without anything and they are absolutely amazing, too.  I wanted them to look a little extra decadent, so I drizzled  melted chocolate chips mixed with a bit of clear corn syrup (for shine) over the top after they had been out of the oven for about 20 minutes. When you first take the cake out it will be puffed up (shown in picture) like a cookie, and will then fall a bit.  This is a simple recipe that you will love to make and everybody will LOVE to eat! Please try this Gooey Butter Cake next time to satisfy your sweet tooth.  Enjoy your holiday baking!

Chocolate Chip Gooey Butter Cake


Crust
1 box butter-recipe cake mix
1 egg
1/2 c (1 stick) butter, melted

Filling
1 8 oz. pkg cream cheese, softened
2 eggs
1 tsp. pure vanilla extract
1 16 oz. box powdered sugar
1/2 c. (1 stick) butter, melted
1 c. chocolate chips
Preheat oven to 350 degrees.  Light grease a 9x13 in. baking pan.
In a bowl, combine cake mix, egg, and butter with an electric mixer.  Mix well.  Pat into the bottom of prepared pan and set aside.  Still using an electric mixer, beat cream cheese until smooth; add eggs and vanilla.  Dump powdered sugar and beat very well.  Reduce the speed of mixer and slowly pour in melted butter.  Mix well.  Stir in the chocolate chips. Pour filling onto cake mixture and spread evenly.  Bake for 40-50  minutes (it took me closer to 50 minutes).  You want to center to be a little gooey, so don't bake it past that point!  Remove from oven and allow to cool completely.  If you want to drizzle melted chocolate over the top allow it to cool for at least 15 minutes and then drizzle over.  Allow to cool for at least another hour and then cut into bars.  Enjoy!

Thursday, November 18, 2010

Sweater Weather Meat Loaf with Roasted Vegetables


Whenever I used to think of meat loaf, I would cringe.  I never thought too highly of the humble meatloaf, until I had it prepared this way at my husband's family's house.  I took my mother-in-love's recipe and added a few things to come up with a delicious one pot meal that now my husband and I just love to eat on a chilly day!

So this recipe is originally called Pot Roast Meat Loaf, because it is roasted in a pan with lots of beautiful vegetables just like a pot roast would.  I added what I had in my kitchen: carrots, potatoes, onion, and a more unusual addition of fresh green beans. I season them with salt, pepper, paprika, and basil, and then the meat loaf seasons them while cooking even more with it's yummy juices!  The vegetables make your meat loaf look even tastier whenever you take it out of the oven!  I love to cut my carrots on a bias for a little more elegance, but it will taste great however you chop!  After all, this is just a great rustic dish that you shouldn't have to fuss over. I like to have just a bit of a glaze on the meat loaf, so I came up with this simple one that's perfectly savory and sweet! You can add as much as your family likes.  You guys probably know by now that I believe you don't have to precisely stick to a recipe while cooking--but play around with it to satisfy you and your family's taste!

Hope you try this juicy recipe out sometime and enjoy Sweater Weather Meat Loaf with Roasted Veggies for yourself sometime. If you're like me, when the temperature drops outside and the fireplace is blazing inside, then it's time for comfort food!


Sweater Weather Meat Loaf with Roasted Vegetables

1 lb. lean ground beef
2/3 cup evaporated milk (or regular milk is great, too)
1/3 c. breadcrumbs
1/4 c. ketchup
1 tsp. salt
2 tsp. Worcestershire sauce (add liberally)
1/4 tsp. black pepper
3 medium potatoes, peeled and chopped
1 medium onion
3 medium carrots, peeled and sliced
dried parsley
dried basil
paprika
olive oil

Glaze
Mix together tomato sauce, brown sugar, Worcestershire sauce, paprika, salt and pepper.  This is a sweet and savory sauce.  You can add as much as you like to the meat loaf.


Mix in a large bowl: ground beef, milk, breadcrumbs, ketchup, salt, black pepper, and Worcestershire sauce.  Shape into a loaf in the center of a 9x13 in pan. 

Peel and dice the the potatoes and carrot and onion and toss together with greens beans, salt and pepper, paprika, basil and parsley with olive oil. 

Spread the vegetables around the meat loaf.  Sprinkle some basil over the meatloaf and drizzle a little olive oil over the top, as well.

Cover and bake at 375 degrees for about 50 minutes.  Uncover and add the glaze and bake uncovered for about 15 more minutes.  Turn on the broiler for the last 2 minutes to brown everything.

Tuesday, November 16, 2010

My Husband's Leek, Potato, & Baby Portabello Tart with Gruyère


     I love it whenever my husband takes the time to cook me dinner, but I have to say that this time he out did himself!  If surprising me with delectable autumnal spread is what he was after, then his mission was definitely accomplished!  It started off with a fresh, seasonal salad with dried cranberries, the next "course" was a beautiful curried butternut squash soup, then came the perfectly baked savory tart.  This tart was no ordinary entrée.  It was made with a homemade, buttery crust filled with a melody of leeks, potatoes, baby portabello mushrooms, and Gruyère cheese in a seasoned blend of eggs and goodness--Awe!  I am serious whenever I say this was a mouthwatering meal!  Oh, and I can't forget about the harvest apple crisp.  Every time I thought the next surprise couldn't get better, it did!


I have to share with you the recipe for the tart, because it's such a great dish if you're wanting to try something different, or it would be perfect as a breakfast or brunch item, too!  The crust was easy to make (so he says) and so worth the extra time. It's just right as a flaky, buttery bed for the filling.  Leeks are a great vegetable that I discovered last year.  They are in the onion family, but much more mild than a regular onion.  The way you clean them is soaking them in water and letting all of the sand they hold fall to the bottom of the bowl.  Then slice the leeks and soak them again in clean water to make sure they are very clean and ready to eat. (See in pictures.) Leaks and potatoes are a great marrying of flavors, and that's one reason why I love this dish so much!
This is a beautiful recipe and I'm so thankful for my wonderful husband to take the time to treat me to his cooking.  It was truly better than any restaurant--a perfectly cozy date night at home!  I love that man!!!


Leek, Potato, and Baby Portabello Tart with Gruyere


  • For the crust:
  • 1  cup  flour, plus more for rolling out dough
  • 1/2  teaspoon  salt
  • 1/2  teaspoon  freshly ground black pepper
  • 7  tablespoons  butter, chilled and cut into small pieces

  • For the filling:
  • 3 tablespoons butter
  • 1  cup  thinly sliced leek (about 1 large)
  • 1/4  teaspoon  black pepper
  • 1  medium peeled baking potato, halved lengthwise and cut into 1/4-inch-thick slices (~1 cup), boiled
  • 1/4  pound  baby portabello mushrooms (or any fresh mushroom), cut into about 1-in. pieces
  • 1  cup  fat-free milk
  • 1/2  cup  egg substitute
  • 1/3  cup  (1 1/2 ounces) grated Gruyère or Swiss cheese
  • 2  tablespoons  grated fresh Parmesan cheese
  • 2  teaspoons  fresh thyme leaves
  • 1  tablespoon  Dijon mustard
  • To make the crust: In a medium bowl, mix flour, salt, and pepper. Rub butter into flour until most of it looks like cornmeal but some larger, pea-size pieces remain. Drizzle in 3 tbsp. ice-cold water while stirring quickly with a fork. Or, pulse flour, salt, pepper, and butter in a food processor or blender until a coarse, cornmeal-textured mixture forms, then drizzle in ice water until dough comes together. Turn dough onto a large piece of plastic wrap and use wrap to press dough into a 1-in.-thick disk. Wrap in plastic wrap and refrigerate at least 30 minutes and up to 2 days.


Preheat oven to 375°. Lightly flour a work surface. Unwrap dough; with a rolling pin gently roll it, turning dough 90° between each roll, into a 12-in. circle.
Place rolled-out dough in a 9 1/2-in. tart pan. Trim edges flush with pan edges. Cover dough with a large piece of aluminum foil and weigh down with pie weights, dried beans, or uncooked rice.
Bake crust 20 minutes. Lift foil and weights off crust and bake until beginning to turn golden, about 10 minutes. Let crust cool to room temperature.
 Meanwhile, make filling: Melt butter in a large frying pan over medium-high heat. Add leeks and salt and cook, stirring, until leeks are soft, about 3 minutes. Turn heat to high and add mushrooms and potato. Cook, stirring constantly, until mushrooms have given off their liquid, 5 to 10 minutes. Spread leek mixture into prepared crust.
Place the milk, eggs, cheeses, thyme and mustard in a blender, and process until smooth. Pour milk mixture over leek mixture. Bake at 375° for 40 minutes; let stand for 10 minutes.

Saturday, October 23, 2010

Spice Rubbed Pork Loin Chops with Apple Cider Glaze


I came up with this autumnal recipe by combining two delicious recipes that came from one of my favorite magazines, Cooking Light. I cooked this on a whim, with the help of my husband, because I happened to have everything I needed already at the house.  I love keeping apples and apple cider around during the fall months, and it's a good thing, because this recipe is not only beautiful but unbelievably good! 

     We were surprised at just how much the flavor of the spices came out in the meat, which was perfect in combination with the sweet cider and honey dijon mustard glaze. When adding the cider to the pan, there was a sizzle and a huge cloud of steam that engulfed the pan!  Very dramatic and fun! Remember that if your cider cooks out before the sauce thickens, just add more cider to the pan -- you almost can't have too much.  I happened to find some fresh thyme that I added to the sauce after it reduced and thickened to a beautiful dark amber color.  I didn't let one drop of that go to waste!  The apples that I used were Jonathan apples, but, you could use other kinds of apple if you like.  Jonathan's are usually in season in the fall only.  Another thing to remember is to not stir the apple too much or they will fall apart and break down.  (They would still taste good, but not look as pretty as the half moon slices!)  I love using my cast iron skillet for recipes like this one--anytime I'm pan frying or searing meat it makes a beautiful crust on the outside and cooks everything very evenly.  I was impressed with the crispy sear that held in all of the yummy juices!

     Spice Rubbed Pork Loin Chops with Apple Cider Glaze is an amazingly good recipe, and is surprisingly easy to make!  It's easy to make, and the flavors are bold and very seasonal!  I served it with pecan, cranberry couscous and homemade sweet potato fries.  On a cool, fall evening this is the meal to enjoy!


Spice Rubbed Pork Loin Chops with Apple Cider Glaze 
    
     Mix together salt, pepper, ground coriander, cinnamon, and nutmeg in a small bowl.  About 1/2 tsp. salt, 1/4 tsp. pepper and ground coriander, and 1/8 tsp. cinnamon and nutmeg.  Rub this mixture on both sides of the pork loin chops.  Heat a large (preferably cast iron) skillet over medium high heat and swirl olive oil twice around the pan, and about 1 Tbsp. butter.  Add the pork and cook on each side for about 3 minutes each. When I turn the pork loin chops once, I turned down the heat just a little. You may be tempted to flip before the 3 minutes is up, but trust me and wait to get that great crust. Once the pork is cooked take out of the skillet and set aside. 
    
     Turn the heat down to medium and add 1 Tbsp. butter and about 1/2 cup of apple cider to deglaze the pan by scraping the yummy bits off the bottom.  Bits equal flavor!  Then add about one generous Tbsp. of honey dijon mustard to the pan and continue to stir. Add one sliced apple and gently stir in. Stir occasionally while it simmers. Place your pork loin chops back in the pan with the glaze during the last minute of cooking. It doesn't take long for the sauce to get  thickened and glossy.  Add as much salt and pepper as you like, and a few sprigs of fresh thyme. 
     Once the sauce is nice a dark and thick, and the apples are tender you can plate it up.  I placed the pork on a bed of the couscous and then spooned the sauce over the top with the apples.  It's beautiful this way, and the couscous soaks up some of the yummy sweet flavor from the apple cider and spicy flavor from the dry-rubbed pork!  Garnish with fresh thyme.

Grocery List
Pork Loin Chops
Salt
Pepper
Ground Coriander
Cinnamon
Nutmeg
Olive Oil
Butter
1 Apple
Apple Cider
Honey Dijon or Dijon Mustard
Fresh Thyme