Wednesday, April 13, 2011

Garlic & Lemon Pan Fried Pork Loin Chops with Roasted Asparagus and Potatoes


     There is nothing like a beautiful warm day to make you want to cook with fresh garden inspired flavors! Things like my homemade garlic and lemon marinade for the meat and fresh spring asparagus remind me that change is in the air--and in my kitchen! (I'm already anxiously awaiting for the Farmer's Market to open!)

     My favorite flavors, and ones I keep on hand, for marinade include freshly squeezed lemon juice and zest, minced garlic, fruity extra virgin olive oil, and herbs.  Simply perfect... Mediterranean inspired flavors that boast health and incredible flavor!  So, when I got a break at work today I ran home and whipped up the quick marinade for my thin cut pork loin chops.  I like this cut of meat because it's quite lean for pork, and because it's so thin it cooks up quickly for a week night meal.  I dusted them in a light coating of seasoned flour and pan fried in my trusty cast iron skillet.  Awe, the pork turns out so crispy and golden brown on the outside, while staying incredibly juicy and bursting with bright lemon and garlic flavor in the inside!  Yes. I get excited about food. (If you haven't already noticed.)

     I thought asparagus would go perfectly with this.  My favorite way to have asparagus is to simply roast it on high heat with olive oil, kosher or sea salt and freshly cracked pepper.  Delicious and so easy to prepare.  For the roasted potatoes, I basically do the same thing.  Tonight I added some delicious Herb de Provence to keep with the Mediterranean flair.  Sometimes I like seasoning my potatoes with garlic and parmesan cheese, and other times cajun seasoning for more of a seasoned French fry  that goes perfectly with grilled burgers!  They're all so good and easy.  I usually always leave the skins on the potatoes when I roast them because they are full of fiber and get crispy in the oven, but the skin on this particular potato didn't look good so I peeled it instead.  
  
     This meal is quick enough for a weeknight meal, and yet good enough for the weekend!  Try preparing meals with in-season vegetables and fruits, and your food will always taste better!  What are you seasonally cooking this Spring? 


Garlic and Lemon Pan Fried Pork Loin Chops

1 lemon

1 Tbsp. minced garlic

1 tsp. (approx) Herb de Provence or Italian Seasoning
(Or any fresh you have, for that matter:)

kosher or sea salt 

freshly ground black pepper

extra virgin olive oil

4 thin pork loin chops

1/2 c. flour


Mix first 5 ingredients together and while stirring, slowly pour in olive oil.  Add enough to about double the amount of marinade. (Approx. 1:2 ratio of lemon juice to olive oil) Stir together well.  

Place loin chops in a large freezer bag and add marinade.  Smoosh all together to completely saturate the pork.  Put in the fridge and allow to marinate for 4-8 hours. That is plenty of time for how this thin cut of meat.


Over medium high heat, add about 3 swirls around the pan of oil in a large cast iron skillet.
Take pork out of the bag and discard bag and extra marinade.  Wipe off the pork with a paper towel to get the excess marinate off.  (Too much moisture on meat won't allow it to brown properly.)  Lightly dredge pork through flour (you have seasoned with salt and pepper), tapping off excess flour.  Place in hot pan for about 3 minutes per side or until golden brown.  

Take out and place on paper towels to drain.  Serve with roasted asparagus and potatoes.


Roasted Asparagus and Potatoes

Set your oven to 425 degrees.

Although I bake them in separate pans, I season basically the same way.
Toss freshly washed trimmed asparagus and chopped potatoes in a bit of extra virgin olive oil. You may want to add the oil gradually so you don't get too much.  You don't want the veggies swimming in it, by all means! Season very well (especially potatoes) with kosher or sea salt and freshly ground black pepper.  (That is all I usually do with the asparagus, although I have been known to also add some chopped garlic.)  With the potatoes I also added some Herb de Provence to compliment the pork.  Toss together well.

Roast in a shallow baking dish, lined in aluminum foil for about 25- 30 minutes or so. The potatoes will take a little longer than the asparagus, although we do like our asparagus on the crispy side.  If you want your potatoes to brown well and get crispy, do not crowd the pan.  ( I did this in a hurry tonight and that's why they aren't that pretty---but just as tasty!)


I'm linking this to Kim at Savvy Southern Style


Tuesday, April 12, 2011

Perfect Morning for Heartwarming Raspberry & Hazelnut Oatmeal


     I love waking up to a beautiful morning, like this one, especially when I'm off work!  Yes, I usually blog on my days off.  It's just a fun hobby that I look forward to doing whenever I have the time!  It's a brisk 55 degrees outside and everything is thoroughly saturated from the drenching downpour of rain we got yesterday and all night. (I have to remember that April showers bring pretty May flowers!) I can't wait to see how big my iris sprouts have gotten after all that rain!

     This morning, I was craving something comforting and satisfying for breakfast.  What better than a creamy bowl of old fashioned oatmeal to slowly wake up!  There is just something about a hot breakfast that stays with you all day.  Besides the fact, the toppings for it are so fun to add!


I cooked -my favorite- old fashioned oats in skim milk instead of water for an extra creamy consistency.  That way I don't feel the need to put in any butter.  (Although it would be very yummy, it's an easy way for me to cut back for bathing suit season!)  I added in some of my new Trader Joe's Less-Sugar Raspberry Jam, chopped hazelnuts, a couple swirls of honey and some ground cinnamon to round off my oatmeal breakfast.


I stirred it all together in the pan I cooked it in, and serve it in a dainty lotus cup with some extra jam on top! Oatmeal for one :)


So pretty and delicious!


Here's a bite for you!


See the sweet, little bunny with carrots in background?  They are my new salt and pepper shakers!


My parents surprised me with that little gift just a couple of days ago, when they came for a visit!  I love the vintage looking colors and glaze of the bunny and carrots!


He's just the cutest thing....Peter Rabbit...as we call him!  Mom used to read that story to me as a child. Since then, I have always loved bunnies!

Hope you all have a blessed morning and also cherish even the small things that have been given to you! 


I'm linking to:


&

Photobucket


Tuesday, April 5, 2011

Spicy Cajun Jambalaya with Moist Skillet Cornbread


     So on my day off work, and my gardening finished (I love my new pots of geraniums by our front door) I was ready to cook a hearty meal for us.  My line of thinking was something spicy...something with the smoked turkey sausage I had...and I was craving some iron skillet cornbread, so it needed to go with that too -light bulb!- Cajun Jambalaya!

     This is a healthy recipe, because I added beans (the recipe didn't call for them originally), lots of veggies, whole grain rice and yummy smoked turkey sausage.  The combination of all of this, plus tomatoes, fat free vegetable broth and spices, then you've got a rich, feel-good meal that tastes incredible and is good on the waistline, too!  I try to be very aware of our health whenever I'm cooking.  I pretty much use only olive oil,  fat free or low sodium broth, soups and stocks, use turkey sausage almost always instead of pork sausage, and cook with lean meats as much as possible.  When something calls for veggies, like this recipe, I just chop up extra to add in for easy nutrition or add a can of rinsed beans for good protein!  As you know, not all my recipes are this healthy, and on those days I have to use good portion control.  No food is off limits totally when you're smart about it.  That was just my two cents on healthy meal planning. :)

     This dish originally called for sausage, chicken and shrimp.  I just had sausage on hand and ready so that's the only meat I used, but I think all of them together would be traditional for jambalaya and so tasty.  It just goes to show that you don't have to be a stickler to recipes, just let your pantry help guide you through.  I think cooking for family should be a casual and an enjoyable experience.  Cooking and baking just makes me happy, and doing it for others brings me joy!

     I served up this delicious jambalaya with a basic skillet cornbread recipe.  I got the recipe on the back of the House-Autry Stone Ground Yellow Cornmeal's bag. (I think it's the same general recipe on every cornmeal bag.) I like to add a dash of black pepper to the batter for an extra savory note, and add some creamed corn to sweeten up the cornbread and make it incredibly moist!  Put a little butter in the cast iron skillet and melt it in a very hot oven, so when you pour the cornbread batter in it will sizzle and brown the edges to the crisy goodness you want!  You gotta know how to make cornbread in the South!


(Stirring in the black pepper)


(Looks at those bubbly brown edges instantly after pouring in the batter!)


(Nothin' like Southern food.)

This meal is a comforting and delicious way to end the day.  I hope it finds it's way onto your dinner table soon!


Jambalaya Goodness

1/4 c. olive oil

1 pkg. Butterball smoked turkey sausage, sliced  

3/4 c. green bell pepper, diced

3/4 c. celery, diced

3/4 c. onion, diced

2 Tbsp. minced garlic

1 Tbsp. cajun seasoning

3 dried bay leaves

few dashes of hot sauce

few dashes Worchestershire sauce

1 can beans (pinto or black), drained and rinsed

1 28 oz can diced tomatoes, drained

1 c. rice

3 cups liquid
(I used 1 can vegetable broth-2 cups- and 1 c. water)


In a large pot, add about half the oil and saute the smoked turkey sausage over medium heat for about 5 minutes.

Once browned a bit, place on paper towels to drain and set aside.  In the same pot add the rest of the oil and add the peppers, celery and onion.  Cook for about 8-10 minutes or until tender.


Add garlic and sausage back to the pot. Season with Cajun seasonings a little salt and pepper, bay leaves, hot sauce, Worchestershire sauce and add beans and diced tomatoes.  Stir well.


Next add rice and slowly add broth and water.


(The original recipe calls for this to cook for about 15 minutes, but I used brown Basmati rice and it took a good 45 minutes or so to cook.) So, I just put the lid on it and let kept it at a low simmer on med-low heat, stirring occasionally.  Most of the liquid will get soaked up in the rice and flavor it very well.  Enjoy!
Serves 4-6


I'm linking this to:

Savvy Southern Style's
Wow us Wednesdays


Photobucket


Monday, April 4, 2011

Juicy Jamaican Jerk Grilled Chicken with Grilled Vegetables


     Welcome to grilling season!  Who doesn't like to to grill the minute it gets warm enough to be outside without dressing in layers?  This weekend we got our little charcoal grill out and fired it up to make some grilled chicken.  I wanted to try my hand at a new and different marinade that would fully flavor the chicken in only about 4 hours.  Ideally, I like to marinate meats for about 24 hours, but I only had a few hours so I needed something intense and of course, delicious!  So, this is basically a marinade recipe. I can't take credit for the grilling, because my husband did all of the grilling here.  Didn't he do a great job?

     I wanted the base of this marinade to be what I always find to be a good combination: olive oil, lemon juice, and garlic.  I wanted to add more spice so I remembered that I had a jar of McCormick Jamaican Jerk seasoning I knew that would hit the spot.  This particular jerk seasoning isn't too spicy but very flavorful, which is perfect for something that needs a lot of help, like chicken!  With the addition of some fresh "lemon" thyme that one of my best friends -who also loves to cook- gave me and kosher salt and freshly ground black pepper, this marinade was complete.  (I have to tell you that I didn't really measure anything out...so I'm "guesstimating" for the recipe below...please remember this while assembling!  You should use your best judgement for the garlic and seasoning to your own taste.)  Add some cayenne or hot sauce if you want a little more kick!

     I like to marinate my meats in a large freezer bag and just dump everything in the bag and smoosh it together.  (No bowls or clean-up required!)  That way it's easy to distribute everything by working the marinade ingredients all around to get it all incorporated together.  Turn it a couple of times while it sits in the fridge and get the bag back out about 15 minutes before putting it on the grill, so the meat won't be as cold when you start to cook it.  It cooks more evenly that way.  If you forget any of this, no big deal.  Grilling should be easy and fun!!  I served it up with delicious and healthy, grilled orange bell peppers and onions with delicious and not so healthy homemade macaroni and cheese....recipe for that soon!

     Please, try this marinade on your chicken or pork for a juicy and flavorful meal that everyone will love!  It's the perfect addition to your spring and summer menu...so get out your flip flops and fire up the grill!

Happy Grilling :)
                                                                      

Jamaican Jerk Grilled Chicken


(We had) 2 thin chicken breasts and 3 legs

1/4 c. extra virgin olive oil

1 large lemon, juiced

2 cloves garlic, minced

1 Tbsp. McCormick Jamaican Jerk seasoning

2 tsp. fresh thyme

salt & freshly ground black pepper


Mix together with chicken in a freezer bag and marinade for at least 4 hours.
Take out of bag and grill.


Grilled Peppers and Onions

Brush olive oil and sprinkle with kosher salt and black pepper on sliced bell peppers and sweet onion.  Grill along side your meat.  Easy as that!


Friday, April 1, 2011

Incredibly Buttery Chocolate Chunk Scones


     So here I am at the computer with my coffee and new favorite indulgence...to die for scones--err, I mean buttery chocolate chunk scones!  These are incredibly good and perfectly sweet.  This particular one I'm eating right now is still warm from the oven!


     I am off work today, and wanted to bake something with the Scharffen Berger chocolate my husband surprised me with a couple of weeks ago!  Yes, this is a very special thing, because whenever we lived in Louisville a Fresh Market was just down the street from us and  I practically lived there.  I love grocery shopping there, because it's like an experience just to stroll down the isles while listening to their classical music and admire all of the premium produce, meats and fish, homemade bread and pastries, coffee and of course chocolate!  This chocolate is no where to be found where I live now, so when he had to go back to L-ville for a visit, he surprised me with a big basket (my baking sheets one) filled with goodies from Fresh Market which included some semi sweet and bittersweet Scharfeen Berger chocolate .  This stuff is premium for baking and is a pretty penny, but it's rare for me to have it and I love the way it makes everything over the top delicious!

  
     Anyways, so I felt inspired by my favorite, Kirchoff's Bakery.  Yes, the one in Paducah that lets me know ,via facebook, every morning of what delectable pastries they have made for the day.  So I thought I'd make something along those lines...perhaps something you could find in a little patisserie!  What better than chocolate chunk scones?  Perfect to showcase the chocolate without any other competing flavors other than the crumbly, buttery pastry itself.  What a match made in the cozy little kitchen's Heaven! (Oh my, the Hubby will be thrilled when he finds these when getting home from a long day!) 

     I found this particular recipe in The Ghiradelli Chocolate Cookbook.  I know, I know.  I didn't use Ghiradella chocolate in them, because I didn't have any.  I do love Ghiradelli chocolate and that would be a wonderful substitute that's easier to find.  It's an easy recipe to follow.  I don't think I changed anything major, except I did use bittersweet chocolate instead of semi-sweet, so I was quite heavy handed on the sugar sprinkling at the end.  I gave them a thick coat of sugar for a crispy sweet top that goes well with the soft center. 

     These chocolate chunk scones are a treat that's sure to be written in my own recipe book!  For an afternoon snack, dessert, or a lovely breakfast you can enjoy these hot from the oven, for they have "delicious" written all over each bite!


Incredibly Buttery Chocolate Chunk Scones


2 c. all purpose flour

1 Tbsp. baking powder

1/3 c. granulated white sugar

1/2 tsp. salt

6 oz. semi-sweet or bittersweet chocolate baking bars, coarsely chopped

6 Tbsp. butter (3/4 stick), cut into cubes
(I have to add here, that I just now realized I actually put in a whole stick.  No wonder it was so yum!)

3/4 c. heavy cream

2 egg yolks


Glaze

1 large egg

1 Tbsp. half n half (milk is fine, too)

1 Tbsp. sugar


Preheat oven to 400 degrees.  Line a baking sheet with parchment paper.

To make the scones in a large bowl, whisk together flour and next 4 ingredients until combined.  Add the chopped chocolate and stir until mixed.  


With a pastry blender, cut in the butter.


In a small bowl, stir together heavy cream and egg yolk until slightly blended.  Add to the four mixture and stir with a spoon until the dough just starts to come together.  Use your hands to knead the dough until it can be gathered into a moist ball.  Do not over knead!--the stickiness of the dough is good.


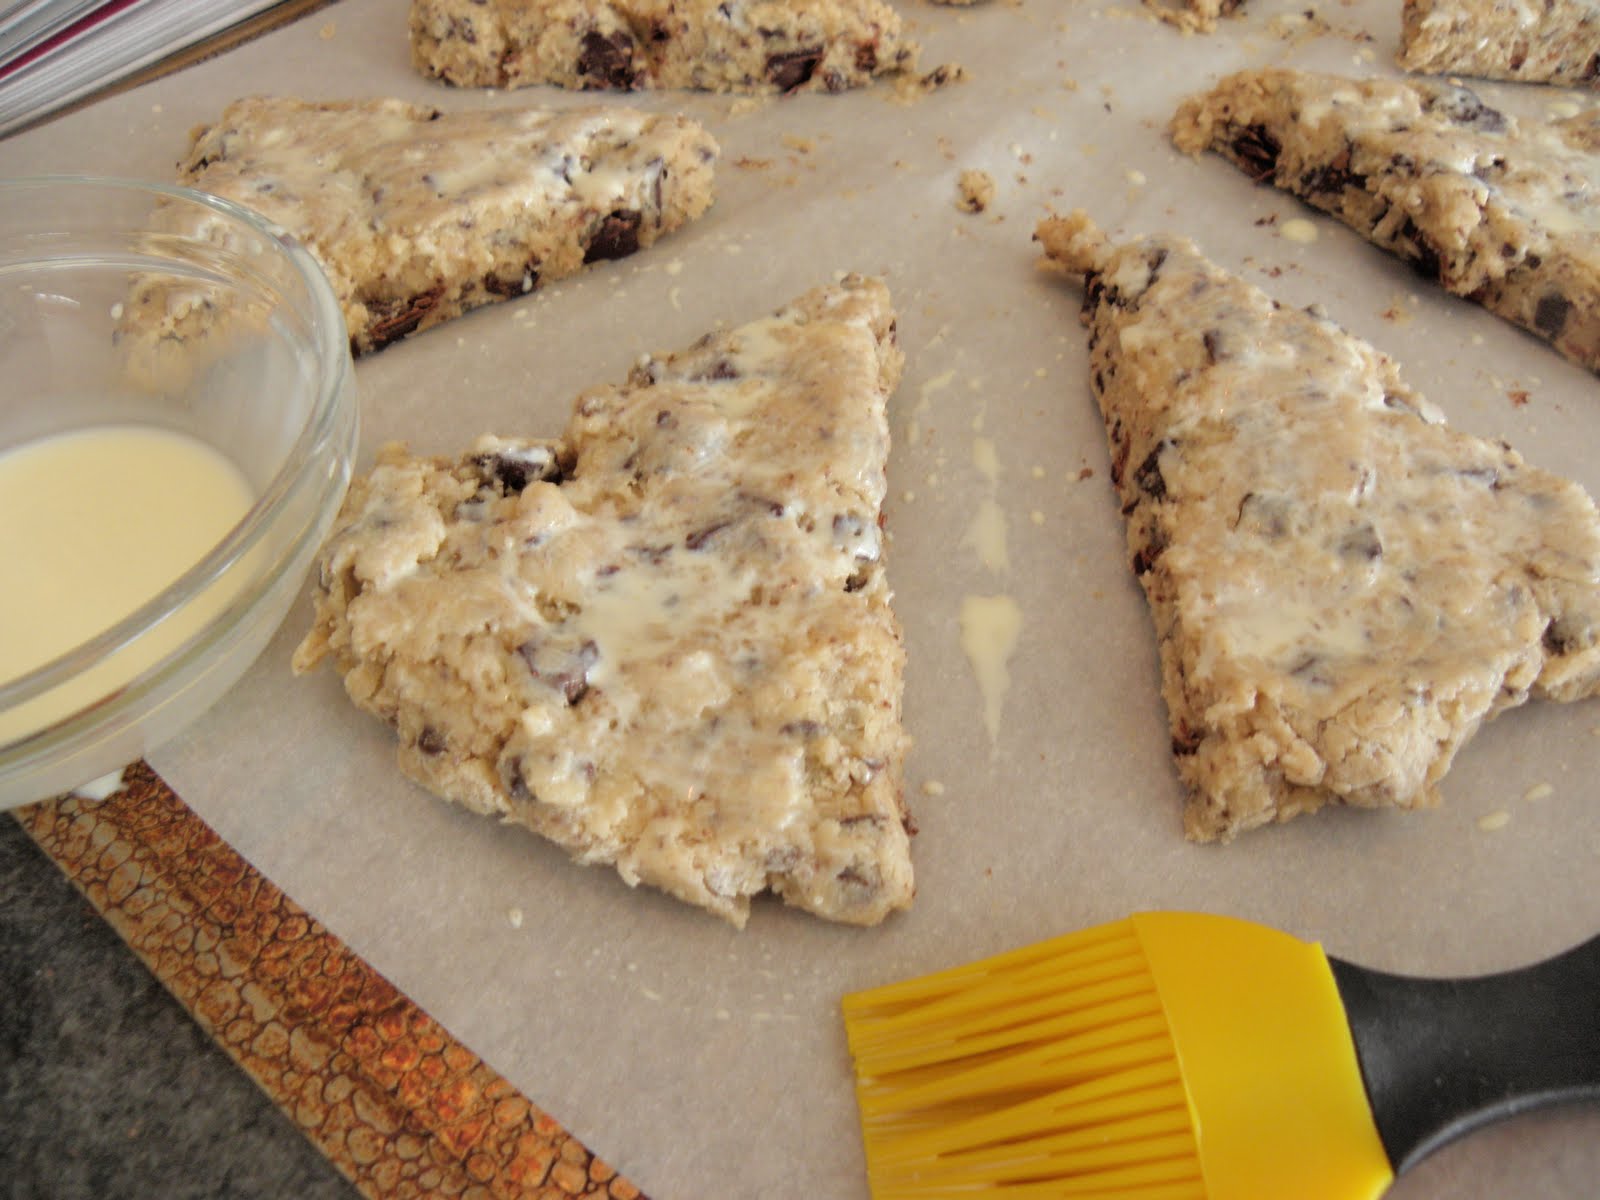
Set the ball on the prepared baking sheet and flatten out to form a round about 8 inches in diameter and 1 inch thinck.. With a sharp knife, cut the dough into eight wedges and separate the wedges about 2 inches apart on the baking sheet.


For the glaze, lightly beat the egg and milk.  Using a pastry brush, brush the tops of each scone with the mixture and sprinkle with sugar.


Bake the scones for 18-20 minutes, until a toothpick comes out of the center clean.  Let cool slightly before serving, about 10 minutes.  These can be stored for 2-3 days.  Makes 8 servings.


Tuesday, March 29, 2011

Delicious Homemade Spaghetti and Meatballs


      "When the moon hits your eye like a big pizza pie....that's Amore!!!"

     This is not your Grandmother's spaghetti and meatball recipe! This starts with a slightly spicy tomato and basil marinara made from scratch. That is then doused over big, hearty meatballs made from ground sirloin, Italian sausage, fresh parsley and parmigiano reggiano cheese among other yummy things, which is then smothered with freshly grated mozzarella and topped with a shower of basil leaves and more parmigiano reggiano before being baked off until hot and bubbly!  Is your mouth watering yet?


     Of course this recipe stems from non other than one of the "Ultimates" from Tyler -the most amazing chef- Florence.  I am a big fan of his, and he made me a big fan of meatballs!  I didn't even like them before this recipe! These are juicy and packed with so much flavor. They pair perfectly with this marinara sauce that is a recipe that I came up with, and we love it!!  I use this for just about everything Italian...pasta primavera, chicken parmesean or just plain with pasta.  The sauce is made from scratch and you can tell a difference in the taste from this and a jarred kind.  I think the dash of olive oil while it simmers makes it so rich and delicious, along with fresh basil.  (I really need a basil plant for as much as I like it.)  My husband loves it so much, there are times that he actually craves it!  So being paired with these incredible meatballs, you have a home cooked meal that's dressed to impress without being fussy.

     It's pretty simple to make, even though there are a few steps. I like to prepare the meatballs ahead of time and have them in the fridge ready to cook when the guests are about to arrive.  Also, I have made the sauce the morning of and put it in a crock pot on low until dinner is ready.  Doing that actually intensifies all the flavors in the meatballs and sauce even more.  I just made this a couple of nights ago when some good friends of ours came over for dinner and a movie.  The spaghetti and meatballs were a huge hit, although I made way too much!  I tend to do that--cook about 3 times as much as I need.  Good thing we love leftovers!

     These spaghetti and meatballs are truly comfort food that will make you feel good! So, make a fresh Caesar salad and toast some bread to dip in olive oil and try this to change up your same ole spaghetti routine for Sunday's dinner!


Hearty Homemade Spaghetti and Meatballs

kosher salt

extra virgin olive oil

1 onion, chopped

2 garlic cloves, chopped (I used pre-minced)

2 tbsp. finely chopped fresh italian parsley

1 c. milk

4 slices firm, white bread, crusts removed, cut into cubes
(this time I used 2 cups of dry bread crumbs instead and loved it)

1 1/2 lb. ground sirloin

1 1/2 lb. mild italian sausage

1 egg

1/2 c. freshly grated Parmigiano-Reggiano cheese, plus more for serving

Freshly ground black pepper

Homemade Marinara (recipe follows) or good quality jarred tomato sauce

1/2 lb. mozzarella cheese, grated

basil leaves

1 lb. spaghetti


Bring a big pot of salted water to a boil for the spaghetti.


Heat 3 Tbsp. of oil in an ovenproof skillet over medium heat.  Add the onion and allow soften for a few minutes.  Add the garlic cook for a couple more minutes.  About 10 minutes all together.  Take pan off heat and let cool.


Pour Milk over the bread in a bowl and let soak while veggies are cooking.  If using dried bread crumbs, do the same thing.  Combine meats in a large bowl. Squeeze out excess milk from bread crumbs. Add egg and moistened bread crumbs and season generously with salt and pepper.  Add cheese, parsley and onion mixture and mix well.  Your hands are the best tools here!  Shape into about 20-25  meatballs.  I think I made about 25, and froze just a few for a later time.


Preheat oven to 350 degrees.  Heat a "3 count" of oil in the skillet over medium heat, and brown meatball on all sides, about 10 minutes.  I like using a cast iron skillet for this.  Transfer them to a baking dish and spoon about half the sauce over.  Shower the mozzarella and scatter about half of the basil leaves on top.  Drizzle with olive oil.  Put meatballs in the oven and bake, about 28-30 minutes. Serve atop spaghetti with homemade marinara and more basil leaves for garnish. 
Serves 6-8


Homemade Tomato and Basil Marinara

2-28 oz. cans crushed tomatoes

1-28 oz. can diced tomatoes, drained

1 small can tomato paste (didn't use this time, and wish I did)

1 onion, diced

2-3 cloves minced garlic

15-20 basil leaves

1 tsp. crushed red pepper

1 1/2 tsp. tsp. dried italian seasonings

1 tsp. sugar

salt and freshly cracked black pepper


In a large saucepan, heat olive oil.  Add onion and cook until softened.  Add garlic and red pepper and cook a couple more minutes.  Carefully add the crushed and diced tomatoes.  Stir in tomato paste.  Add sugar, Italian seasoning, salt and pepper and fresh basil leaves.  


Taste and adjust seasoning.  Add about 2 Tbsp. olive oil for an incredibly wonderful, rich and flavorful sauce. Bring to a soft boil for about 5 minutes, and reduce heat and let simmer for at least 30 minutes -- the longer the better. If using, transfer to the crock pot after letting the sauce simmer for just a few minutes.  Turn crock pot on low and cook until ready to use.  Pour in drained pasta and stir together before plating with meatballs.


I'm linking up with Savvy Southern Style
Photobucket