Thursday, July 8, 2010

Mama's Banana Split Pie


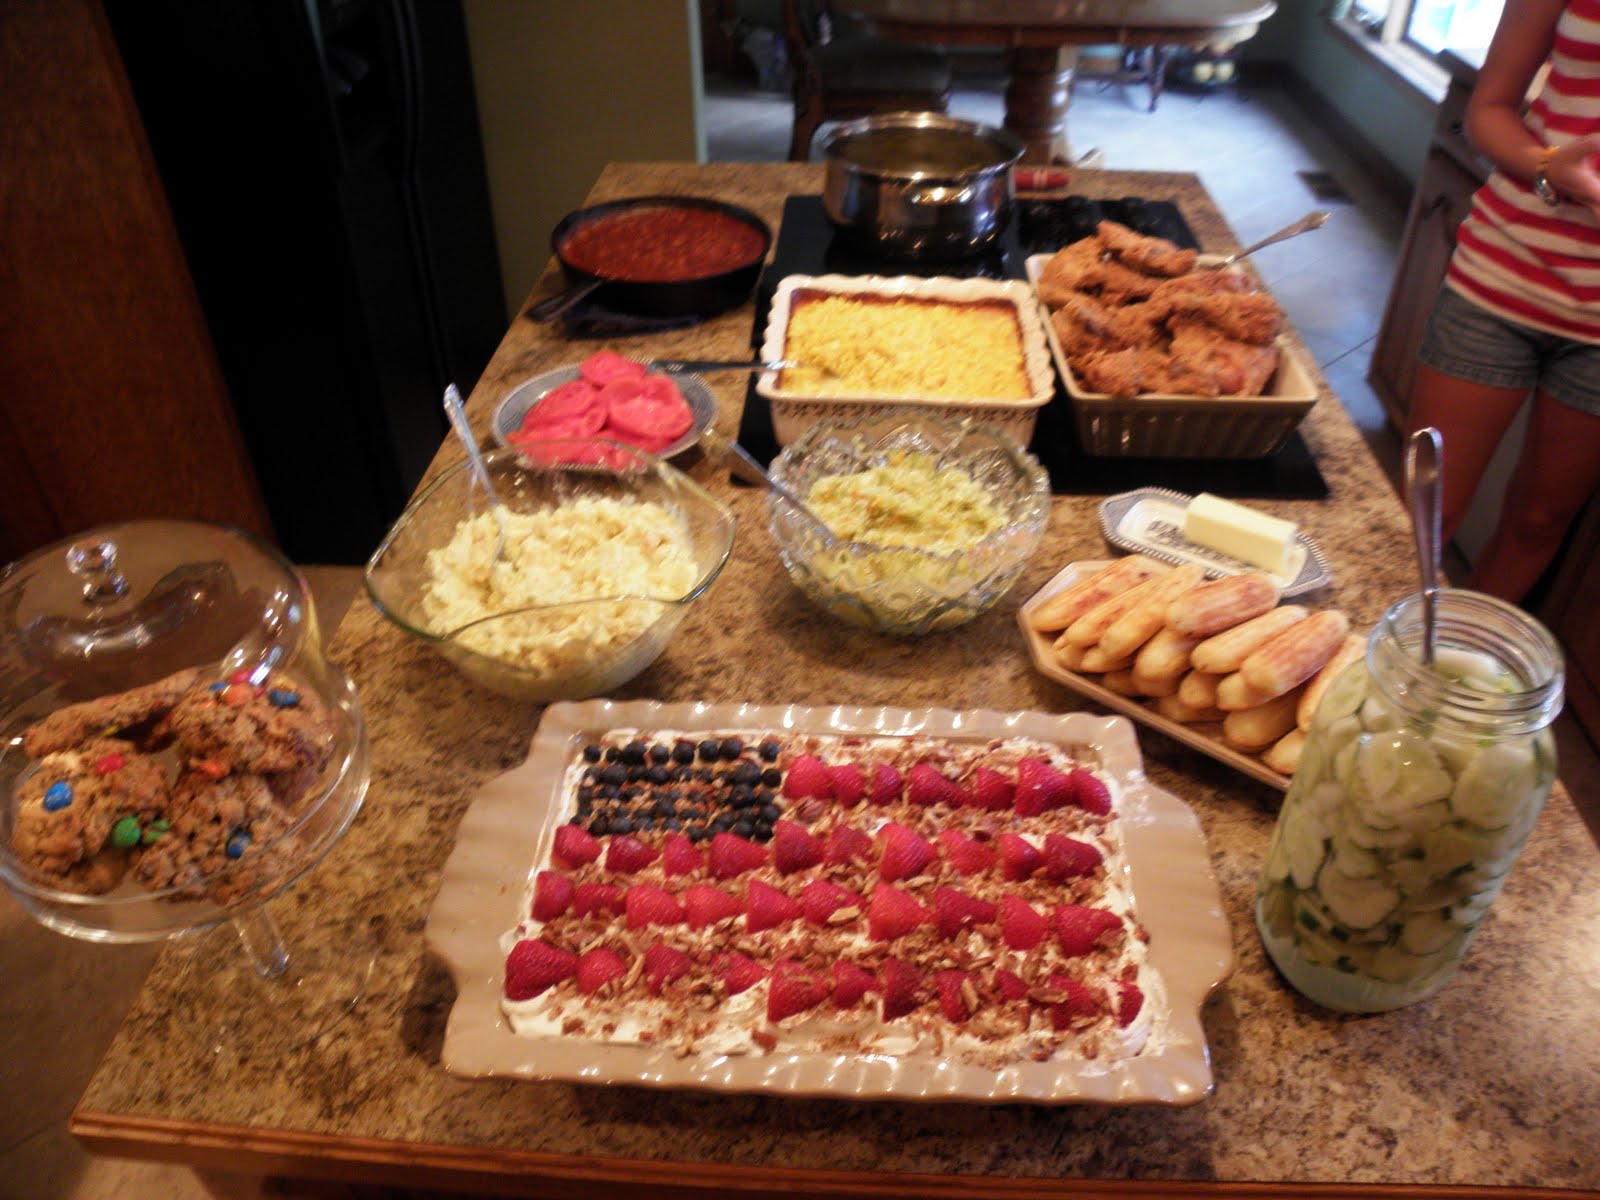
   Happy Independence Day!  It's not too late to say that, right?  I thank God everyday for the freedoms that we have in America!  I've been inspired to share a couple of summer treats with you in celebration of the Fourth of July! This one is particular is definitely one of the best summer traditions in my family.  Every Fourth, my mom makes this fabulous Banana Split Pie that everybody looks forward to eating!  So much for the BBQ and fried chicken, give me the pie!!!

   It consists of  the tropical flavors of the season!  The pineapple and bananas are the stars of this pie, but put that on top of a homemade graham cracker crust, with a dreamy creamy filling, and whipped cream and toasted pecans....and....well, it's just mouth-watering good!  We always decorate it like a flag on the Fourth of July, with fresh strawberries and blueberries which makes it a festive centerpiece for the dessert table.  Otherwise, we sprinkle on the toasted pecans and marachino cherries for a true banana spit finish. Remember, if you make this into a flag, you will need to use a 9x13 pan and double the recipe. It will serve several people this way, too. This is actually an easy recipe that looks and tastes like SO much more!  You have to try this cool dessert on a hot summers day or share in our tradition and make it in celebration of our America the beautiful!


Banana Split Pie


The Crust:
Crushed graham crackers
2 tsp. sugar
1/2 c. melted butter

Stir all together.   Spread out in a 8" pie pan and press down on the bottom to make an even layer.  No baking is required. (Add as much sugar as you like, or don't add any if you are want.  I believe I usually use about half the box of pre-crushed graham crackers for a 8"pan. )

2 eggs
2c. powdered sugar
1/2 c. butter (1stick)  softened, not melted
15 1/4 oz. can crushed pineapple, drained well
2-3 bananas
4 1/2oz. Cool Whip*
1/4. chopped pecans, toasted
Marachino Cherries or blueberries and strawberries

Beat first 3 ingredients until light and fluffy.  Spread evenly over the graham cracker crust. Drain the pineapple and spread over the filling evenly.  Layer with sliced bananas.  Top with the Cool Whip, nuts and cherries.  If you are making a flag top, use the blueberries where the stars would be and the strawberries for the stripes.  Evenly sprinkle the nuts all around.

Chill for at least 2 hours.  (Do not put in the freezer.  I've made that mistake and it's not a good one!)  Enjoy!!

*We have always used Cool Whip for this recipe, although you can certainly make homemade whipped cream for the top, but eat it soon afterward.  I don't think homemade whipped cream  is as good after it sits for a while.

Saturday, June 26, 2010

Leslie's California Chicken Salad

  
   I love a really good homemade chicken salad on hearty bread, a chewy roll, or with nutty crackers and crudités.  This is something I never thought about making myself until a couple of years ago after my mom surprised me at work and brought me a wonderful lunch!  She had packed her homemade chicken salad with salty crackers and of course freshly baked cookies.  Yes I know, I'm just a little spoiled..err..loved!  Thanks for that, Mom!!  Anyways, after tasting her chicken salad I thought I can do this -- what an easy and delicious lunch.  This is like a California chicken salad. It's made with roasted chicken breast, crunchy toasted nuts and red grapes or pineapple and mixed in with a simple creamy curry dressing.  So delicious!

   Start off by cooking your chicken.  I like to roast mine in the oven.  Usually I season it with whatever I like.  This time I used some Herbs de Provence, just because I was just roasting some chicken breast to eat throughout the week.  I didn't know at the time I was going to put it with a curry dressing, but it actually turned out great.  Most of the time I just use salt and pepper and it's great! If you don't have much time, just pick up a rotisserie chicken from the grocery to use. Once out of the oven, allow to cool and shred your chicken

   Next, you will want to toast your nuts.  Pecan are my favorite, although I have used walnuts, almonds, and even tried cashew and they are all so good!  Just spread them out on a cookie sheet and bake at 350 for maybe 6 minutes or until you can smell the nutty fragrance from the oven.  This makes the nuts taste like candy in your mouth!  Once they are out of the oven, allow to cool and chop.

   Finely dice the celery, cut your red grapes in half, and have ready with the chicken and nuts.  If you use pineapple, which is just as good, used canned pineapple bits and drain well.  This really gives the salad a unique sweetness.

   In a bowl, put about equal portions of (light or regular) miracle whip or mayo, and sour cream.  To this mixture, add salt, fresh cracked pepper, and the yummy curry powder. ( I rarely measure anything whenever I'm making one of my own recipes, but add enough curry powder to your to taste.  Don't be afraid to taste your food along the way!) The curry give it a warm hue that just great.  Mix all of this together and add the chicken, nuts, celery and grapes and it's beautiful and ready to eat!

   Today, I served it on a bed of baby spinach with sunflower-thyme crackers and slices of red bell pepper. This is easy to make for a crowd, so invite your Mom, daughter, or friends over to lunch for Leslie's California Chicken Salad!

Grocery List
Chicken Breast
Pecans, or other nuts
Celery
Grapes, or canned Pineapple bits
Light Mayonnaise or Miracle Whip
Sour Cream
Curry powder
Salt & Pepper

Friday, June 25, 2010

Roasted Garden Corn


   What says summer any more than homegrown garden corn?  I could eat it just about anyway: grilled with a little butter and salt, cooked down and creamed-style, corn chowder -- it all screams summer time flavor!  There's nothing like the natural sweetness that come from freshly picked corn.  It almost doesn't seem like a true Southern meal with out it, at least in my family!

   This recipe is a pretty simple one that I've come up with.  It's basically roasted corn seasoned with aromatics like sweet vidalia onion and green pepper, and seasoned with a little kick!  It's a yummy side dish that I like to prepare with farmer's market corn from the cob and I usually serve it with grilled chicken or pork chops, or (if I'm treating myself) delicious fried chicken.

    To prepare, husk your corn on the cob and obviously try to get all the silk off of the corn.
    Next, I take a good long serrated knife (like a bread knife) and I cut the corn from the cob directly into the baking dish that I will roast the corn into.  Otherwise, whenever I cut it off onto my cutting board that corn will just fly everywhere!  Trust me, I've made quite the mess before.
   After cutting all of your corn off the cob, you will want to get the "corn milk" out, too.  This is a very important part in making the corn taste sweet and the very best it can!  The corn milk is what will make your corn taste fresh from the garden, in my opinion!  How you do this is by using the back of your knife to run down the cob and press all of that good sweet milk out. It's easy to do and worth the little effort.
   Once you have all the corn in the pan, I like to add finely diced onion and green bell pepper to the corn.  I use about equal amounts of the onion and bell pepper.  Add as much as this as you like.
   Pour in a little milk.  Enough to about halfway coat everything, and stir it all  together.
   Next, I had my seasonings.  I like to use the simple combination of salt, freshly cracked pepper and paprika for the pretty color and little something extra.  You can add whatever you like, but since I've already added some onion and pepper for flavor I would keep it pretty simple.  Toss all of the seasonings together with the corn mixture.  Dot it all over with small pats of butter.  Once again, use as much as you prefer.  We try to eat pretty healthy so I only use about 1- 1 1/2 tablespoon or so.
   Put in about a 400 degree oven for about 45 minutes, or until the corn gets nice and tender.  You will want to stir it a couple of times, and add more milk if you like.  I usually don't make this recipe a creamy corn, it's more of a corn relish. The corn gets soft and yet some are a little crunchy and so good!

This corn recipe is so colorful, and delicious that I hope you try it will one of your summer meals!

Grocery List:
Corn on the Cob
Sweet Onion
Green Bell Pepper
Butter
Salt
Pepper
Paprika

Thursday, June 24, 2010

I'm back in my new Cozy Kitchen!


  My husband and I just moved to a cute house in the country and we love it!!!  So, my cozy little kitchen has grown!  I almost forgot how wonderful a dishwasher is, and I am enjoying the use of my first full size refrigerator with a freezer drawer! I have never had a convection oven, so I am learning how to use that with the warming drawer at the bottom. (I love serving all my food hot, so I will get lots of use out of that!)  Also, having a more organized pantry and a new spice rack is so helpful when it comes to cooking. I am so thankful that God helped us find just the right place with a perfect kitchen for me.


   So, I say all that to really say that I'm back (!) in the kitchen and ready to cook and share with you guys!  Summer is the best season for cooking with fresh vegetables and baking with ripe, juicy fruits and berries.  I love the aroma of earthy herbs, zesty marinades and grilling in the air!  I have some summer favorites and some new things that I'm going to try out this season.  Wish me luck, and thanks for reading! 

Monday, April 19, 2010

Lemon Meringue Pie


Spring is here!  This is the time when color comes back into the world and back on our plates; when the days get longer, and the food gets lighter! I love the use of yummy ripe fruits in some of our favorite salads, and especially desserts.  I don't think there's a dessert that says "springtime" any better than a fresh Lemon Meringue Pie!  Every year around Easter I will make one (or two!) of these and share with family and friends.  It's always a hit!  This recipe is one of my husband's very favorites along with Nana's Apple Pie.  This is actually another one of Nana's wonderful recipes, and one that Heath was delighted when I began to make for him after we married.  My mom also grew up loving lemon meringue pie that her mom (my Granny) made her.  In fact, it was her very favorite dessert; so of course I love it, too!

Nana calls this recipe Lemon Ice Box Pie, but I've always called it Lemon Meringue.  Honestly it doesn't really matter when it tastes as good as it this recipe does!  This time I made it in a new tart pan that I just bought.  I couldn't wait to use my new pan, so I thought this would be the first recipe I would make!  I wasn't sure if the crust and filling would hold and stand up after taking it out of the tart pan, but it did and it's so pretty!  It looks more elegant and pretty to see all the layers of the pie (when you make it in a tart pan), like the buttery graham cracker crust, the tart yet sweet lemony filling, and the light and airy meringue.  Beautiful and delicious, this would be so pretty for a bridal shower!  Otherwise, using a traditional pie pan is just as great and would be better for a tall meringue.  There's nothing more Southern that seeing a perfect, tall meringue on a pie!

This recipe is a pretty simple one.  It consists of three things: the crust, filling, and meringue.  The crust is a graham cracker crust that really complements the lemon, I think.  The filling is the best one I've ever had.  I always use some of the zest of the lemon along with the juice to give it even more lemon taste, and that from-scratch look that makes the filling even more appealing.  While we're talking about the filling, I will tell you that this time I used a special kind of lemon.  I'm excited about this, because neat food just makes me happy!  In my Easter basket this year, my husband also gave me some Meyer lemons to make this pie.  I've always heard of Meyer lemons and how good they are, so I was surprised and excited to use these for this recipe!  They have more of a orange-yellow color that made the filling beautiful, and they were so juicy and a little bit sweeter than a regular lemon.  (Thanks, Honey, for my lemons!) This brings me to the point: while you can use any type of lemon, always use fresh squeezed lemon juice.  The kind in the bottle or fake little lemon is just not good in this recipe. Sorry, but it's worth the extra minute to squeeze them!  I think it's kind of fun too, just remember to squeeze them over a small sieve or pick out the seeds.

So, the meringue is a tricky thing that I'm slowly but surely mastering.  Forgive the meringue in the picture, because when I made it this time I used out-of-date cream of tartar, so it didn't fluff properly -- although it still tasted good!  I won't lecture on this, because you just have to practice and have patience for a good meringue.  But I will say that letting the egg whites sit at room temperature (after separating) for 30 minutes with make it fluffier, and always use a very clean bowl and beaters.  If you use a hand mixer then get ready for some arm exercise!  Meringue is a bit of work, but I think the results make the pie extra special.

I really hope this will inspire you to try this perfectly spring recipe of Lemon Meringue Pie (or tart), and share with your family and friends on a warm spring day!

Crust:
1 1/4 graham cracker crumbs  
1/3 c. butter
2 Tbsp. sugar
Melt butter with sugar and add the graham cracker crumbs.  Stir together well, and press in the pie or tart pan. Bake at 375˚ for 10 minutes

Filling:
2 large egg yolks
1 can sweetened condensed milk
1/2 c. freshly squeezed lemon juice
Stir together the ingredients well.  Let the crust cool first, and then add the filling. (Add the zest here too if you use some.)

Meringue:
3 egg whites
1/2 tsp. vanilla
1/4 tsp. cream of tartar
6 Tbsp. sugar
Let the egg whites rest for 30 minutes.  Put in a clean glass mixing bowl with vanilla and cream of tartar. Beat on medium speed until soft peaks form and start adding sugar on tablespoon at a time.  Once the sugar is in, beat on high for 4 minutes until stiff peaks and the meringue is glossy.  Spread over the filling on the pie and push to the edges.  Bake at 350˚ for about 10-12 minutes or until light brown.
Let it cool and serve!

Friday, March 26, 2010

Leslie's Ultimate Chewy Chocolate Chip Cookies

Chocolate. Chip. Cookies.

   Have I got your attention now?  Everyone's favorite cookies are the ones filled with morsels of rich chocolate chip heaven.  Warm and fresh from the oven, a very buttery and sweet brown sugary taste with the warm vanilla undertones and the soft, chewy center......wow!!!  I must warn you though, this batter is just as good as the cookie.  So for all you naughty batter eaters, you will not make it to the oven at all!
I have tried many chocolate chip cookie recipes, for these are my ultimate favorite cookie, and this recipe is the best!  I love, love, love all of the brown sugar that makes these cookies so sweet and chewy.  It also gives them the perfect golden brown color when baked.  I love to use Ghirardelli milk chocolate chips in mine.  They are larger and the milk chocolate melts beautifully!  Sometimes I will combine milk and semi-sweet chocolate chip, too. You may want to try spooning these out in a couple of different sizes, although usually I make them about 1 1/2 Tbsp.
  I am so excited to share this treasured recipe with you all. -- my mouth is watering as I type. I hope they turn out as absolutely delicious for you and your family!  Just remember to not ever get discouraged if a batch isn't as perfect as you'd like, because that's just a wonderful excuse to try again later.  I mess up on things all the time, but always take it as a challenge to come back to the recipe.  After all, the look of food isn't the most important thing, as long as it tastes good -- that's really all that matters!
Enjoy this heartwarming recipe with your loved ones and they will be sure to come back for more visits and cookies!


1c. butter (2sticks)
2 eggs
1 1/2 c. brown sugar
1 tsp. vanilla
2 1/2 c. all purpose flour
1 tsp. salt
1 tsp. baking soda
1 bag of chocolate chips, or chunks (or both!)

Mix (on medium speed) butter and brown sugar, well. Beat in eggs and vanilla until smooth.

Mix flour, baking soda, and salt together.  Carefully mix in  flour mixture in the butter mixture until well incorporated.  Stir in chocolate chips and nuts, if desired.

Drop dough in about 1 1/2 Tbsp. (or your preference of cookie size) on sheet pan 2 inches apart.
400 degrees for about 6-8 minutes, or until golden.

Thursday, March 25, 2010

Good Morning Blueberry Muffins


Breakfast might just be my favorite meal of the day.  I think it brings good memories of me waking up as a child to the smell of bacon frying, biscuits and gravy or our Sunday morning treat--cinnamon rolls!  I am a coffee lover, and I so enjoy the smell of the freshly brewed coffee and taste of the first sip to get you going.  Eating breakfast out is nice, but eating a hot breakfast at home is great on a lazy morning. 
  
These blueberry muffins are a recipe my husband grew up eating as a child.  They are filled with plump, juicy blueberries in a batter that's rich with whole grains and warm spices! Perfect to start off the morning with a steaming cup of your favorite coffee.  
  
Here are a few tips that I have found to help me make this recipe the very best: Before you cream the sugar and butter together, let the butter stand to soften for about an hour or so.  Once you add the wet ingredients, the batter will look a little clumpy (which I kind of flipped out about at first) but precede with adding the dry ingredients and it will turn out perfectly.  I don't like to stir the batter too much. I just stir to combine so that the muffins are left very tender and fluffy.  I have used fresh and frozen blueberries, and they are both delicious.  I always add a couple more berries to the top of the batter, after I fill the muffin cups, to give the muffins the look that they are truly bursting with blueberries!
  
There are actually some healthy benefits to these muffins: like the whole wheat flour, wheat germ and all the anti-oxidants in the blueberries.  I have heard that you could probably substitute about half of the butter for applesauce and still have the right consistency while reducing the fat.  I am always on the lookout for a tasty and healthful recipe to make!
  
These are truly some of the best homemade muffins I have had.  When you wake up to the anticipation of these yummy blueberry muffins, you will start your day with a very good morning!


Good Morning Blueberry Muffins

1c. sugar
1/2c. butter or margarine
1c. milk
1 egg
1c. all-purpose flour
1c. whole wheat flour
1/8 tsp. salt
1/2 tsp. cinnamon
1/4 tsp. nutmeg
2 tsp. baking powder
1/4c. wheat germ (I used honey wheat germ)
1c. fresh or frozen blueberries (I usually add a few more!)

Mix in the order given.  I creamed the sugar and butter with a mixer first, added the milk and egg and mixed well.  Then I combined all the dry ingredients in a separate bowl and mix them in just until combined. Carefully stir in the blueberries.  Evenly divide the batter among the muffin cups.
Bake in well greased muffin pans in a 400 degree F. oven for 22-25 minutes.
Serves about a bakers dozen. (12-13)